Once the rope is safely anchored, the rest of the rope can be used to continue tying. The action of rope wrapping around rope creates friction. It can be used to add structure to a rope pattern without any knot. Frictions are great because they are fast to tie and don’t compact into something hard to untie but they require tension to stay in place.
Progressively adding turns will make frictions more and more solid. It is the compromise between speed and solidity, you can choose what’s best depending on the context and intentions. Some common frictions have names, usually because of their aesthetic or efficiency but there is no problem creating your own by making more or less turns.
Here we explore the basic frictions and decompose the X frictions. There are infinite ways to make frictions and we will explore more styles on Day 204.
Full Turn
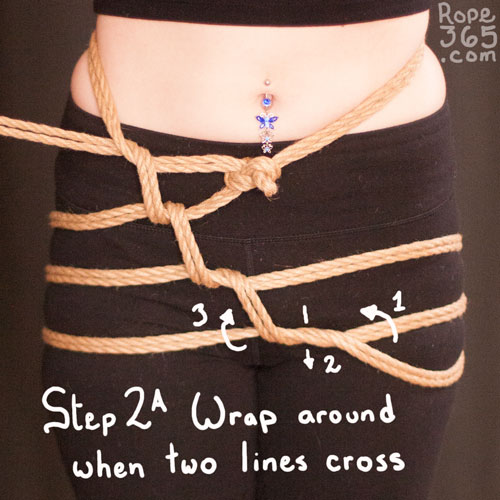
Wrapping a rope around another rope, making a complete loop, creates a first hint of structure. This is also known as 360 friction, loop around or wrap around.
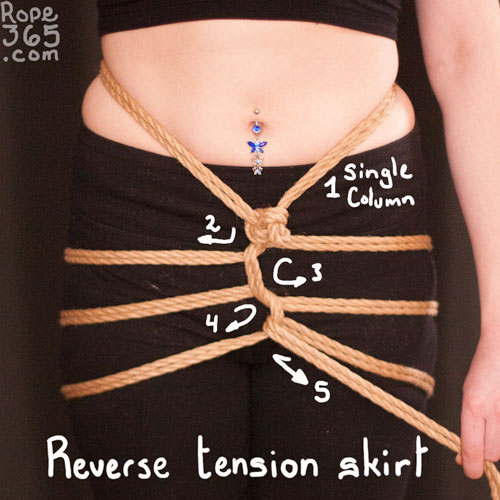
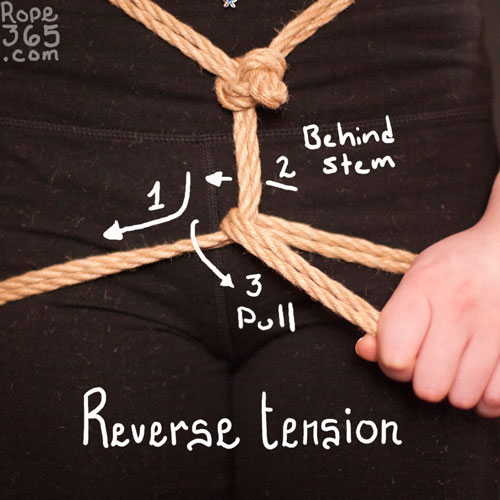
Reverse Tension
Changing tension direction will allow you to make parallel wraps that can hold as long as you maintain tension.
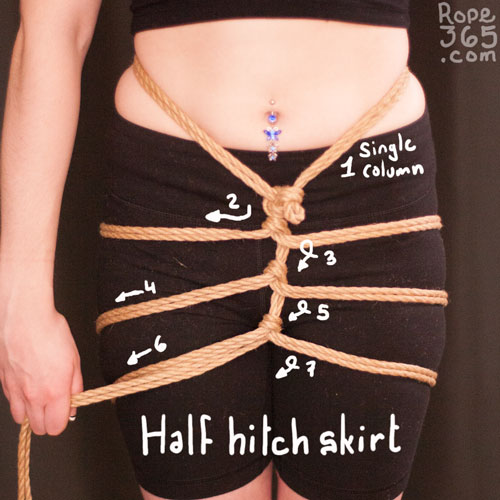
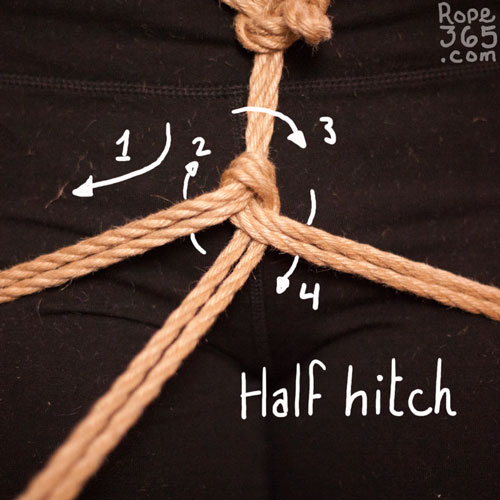
Half Hitch
Adding a turn to the reverse tension will allow the tie to stay in place without pulling so much. This is a structure called the half hitch.
Munter Hitch
More turns make the frictions progressively more stable. This specific shape was made popular by Mr. Munter as a belay technique in climbing. It may be stable if the rope is grippy, but may slide with more slippery rope.

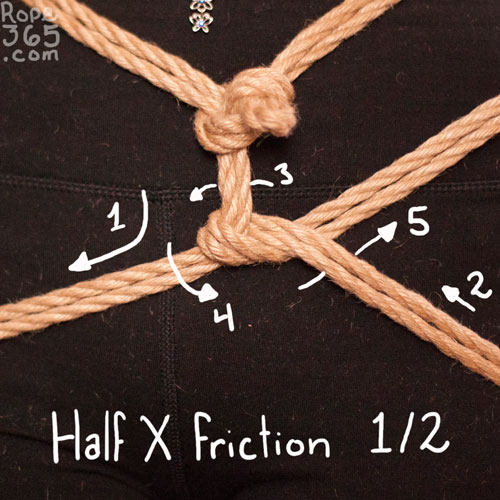
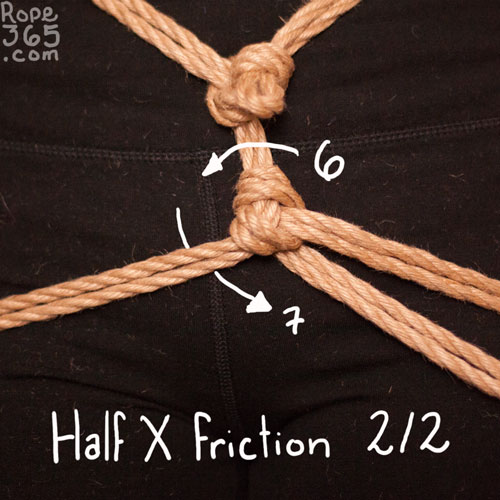
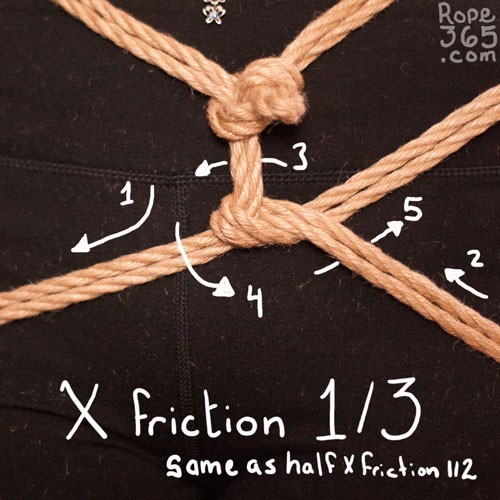
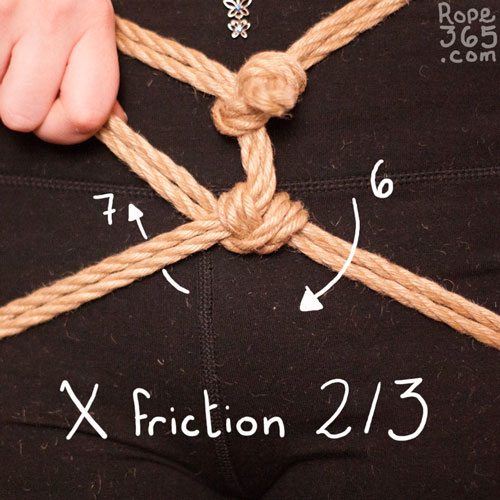
X Friction
The rope crossing over itself in different directions creates a very solid system. The X friction is a very classic pattern because it is very sturdy.


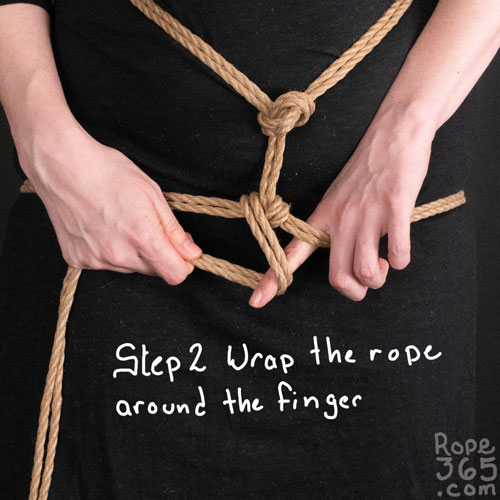
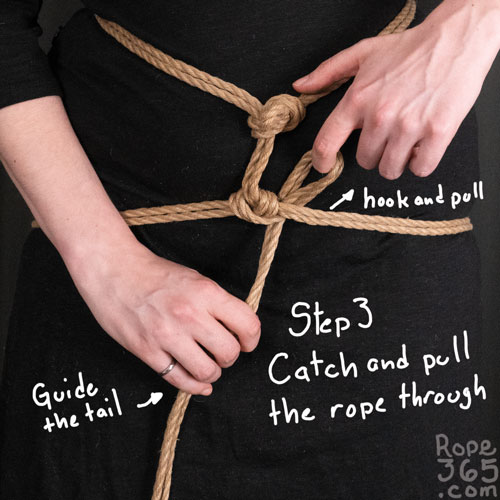
Finger Hooking
Efficient movement will give you more control and will feel completely different for the person being tied. Finger hooking is a technique to insert rope in tight gaps, usually under another rope. The trick is to get a finger in and wrap the rope on it like a crochet hook to pull the rope in. If you have more space, you can also use two fingers and trap the rope between them. Pushing rope in a gap is generally inefficient and can damage it, this is why we need to focus our handling on always pulling the rope.

Video Tutorial
Activate subtitles or transcript to view instructions. Please like and subscribe to support the channel. Also available on Vimeo thanks to our patrons on Patreon.
Practice Time!
Create different variations of the rope skirt using a variety of frictions. Use the finger hooking technique to tie efficiently.
Self-evaluation checklist:
- There are no unnecessary twists in the rope.
- The rope folds in a way that makes the frictions compacted for maximum efficiency.
- Tight frictions will make the rope hard to the touch. The tighter the friction, the more efficient it will be.
Exploration ideas:
- What is the difference between going under and exiting over, versus going over first and then exiting under? Which one has more friction?
- More slippery rope might require additional turns. Which friction is stable enough for your rope?
- Mix and match different frictions in the same tie
- How many movements are required to create each friction?
- How fast can you make it?
- How fast can you untie it?
- Which friction do you find the most aesthetic?
- How much do you need to pull to make the middle section (stem) completely vertical?
- How much space should be between each friction on the stem? Can you make them all even?
- Can you create new frictions based on this technique?
Being Tied: Exploring Balance #1 – sansblague
In this exercise, your rope skirt limits your balance in standing. Take a moment to explore your balance with the help of the person who tied you – let them stay close to you in case you need support. How does it feel to just stand in the rope skirt? How does it feel to stand on one foot? What happens if you try to get to the floor and back up again? To be out of balance can be an exciting experience for some people, just make sure that you do it safely, and there is someone around to support you.
Inspirations and Resources
- Basic Frictions by Anatomie Studio
- How-to: Cross / “X” Friction by Bad Kitty Bondage
- Finger Hooking WILL Improve Your Shibari by Bondage Tuition
Video References
We compiled a Youtube playlist with various videos on this topic, let us know if you find others we should add to this list. Note that video references may display risky or unstable techniques, viewer discernment is advised.
Credit: Rope skirt idea by Butterfly Bondage – Pictures –M: Miss_Soffia R/P: Ebi McKnotty
Hi, I am still fairly new to ropes but have been around to noticed a few people that stand out, such as yourself. I have just recently come upon this and yet another addition to all the work you have already brought to this community. Thank you so much. I am so thrilled with what I am seeing here, this is absolutely beautiful, well explained and illustrated. I have just begun to discover what you have put out and I will be continuing to explore and use these teachings.
Once again thank you !
Hope we can meet some day, might be at nuit des cordes.
Best regards
Michel
Thank you for your message. I wished something existed when I got started. Also, Nuit des Cordes is back in a few weeks 😀
Absolutely love this site. Extremely informative, very well thought out, and excellently delivered with written and visual information to enhance the learning experience. Great resource for a beginner like myself 🙂
Thank you so much for your comment!
Someone just pointed out to me that the Half-X Friction starts out as a Munter! Never realized that before, really helped cement the steps in my head!
Actually, you are right, it is a Munter Hitch… maybe I should change the name. Though the use is different, the Munter is used for belay systems, here the Half-X friction is more of a stepping stone toward the more stable X friction. Thank you for the feedback.
Quick question. The Half X is a Munter Hitch in the locked position. Is that correct?
Yes, that is correct, I need to update the text to rename it Munter hitch… though the Munter hitch was designed to do a belay.
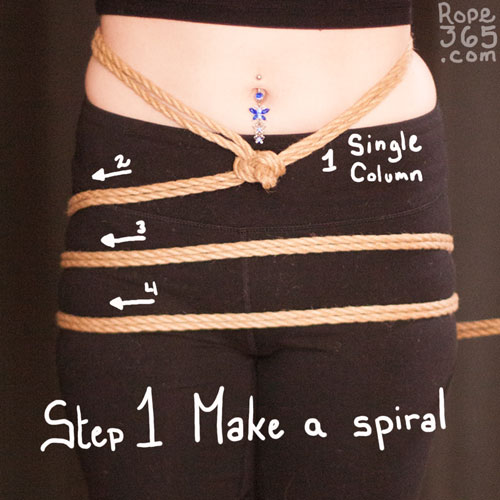
Hi! what type of knot is “1 single column” at the beginning in every kind of friction that you show? Thanks!!!
In the examples, I used a single wrap Somerville bowline, a variant of day 1, but any single column tie will do.
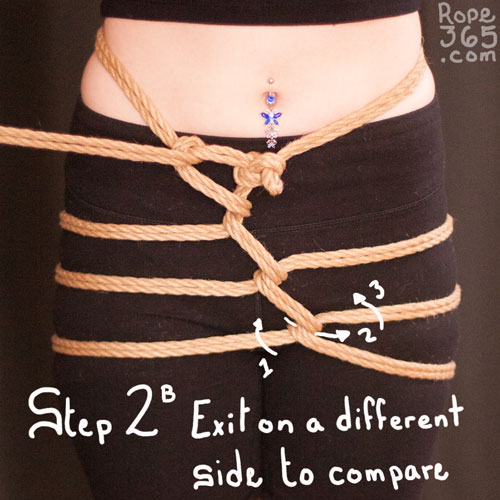
In the loop around, I’m a bit confused as to how step 2a and 2b are related. It doesn’t seem like step 2b uses step 1. I was able to figure out how step 2b works after a lot of staring and trying it out on myself, but it’s pretty unclear just from the image and the corresponding text just confuses me more. I’m a total beginner to this though and this is the best website I can find, am I just missing something?
Thank you for the feedback. This is one of the first tutorials I made and with your description I think I understand why it’s confusing. I plan on updating it and will keep your feedback into account.
Watched this video a couple of times and only just noticed the ring. Couldn’t stop laughing. I find it fitting (and reassuring) that this subject should be taught by an engineer.
I realize this observation is not relevant to the subject at hand, and perhaps it doesn’t really belong in this thread. Being surprised to suddenly notice something personal in the middle of a somewhat anonymous video made we want to say hello.
Interestingly, I have a friend who teaches rope (here in BC), the only advanced rigger I really know, and he is also an engineer. Actually, it makes a lot of sense for those who like dealing in systems and structures to be drawn to rope.
I’m brand new to this, and really like this website in many ways. I particularly like the lack of verbal instruction in the videos (all show, no tell), which creates a meditative atmosphere. I also like the focus on awareness and relating in many of the sections and exercises.
Keep up the good work!
Yeah, it’s quite logical for engineers to be interested in rope, I especially enjoy the design aspect.
I’m happy you enjoy the slower approach. It was definitely a deliberate choice and one I wasn’t sure people would like as it’s quite different to what other creators are doing.
Ah ah, good sense of observation ????
I really appreciate the time you’ve taken to make this website. Everything is explained so clearly and thoroughly, with helpful visuals. It’s been a huge support to me as a beginner.
I would like to give feedback for your videos as some who designs instructional materials professionally and as someone who is brand new to shibari. First, audio would be really helpful! Watching both the video and reading the subtitles for instruction means we have two competing visual inputs to focus on at once, so while we’re reading, we’re missing what you are demonstrating or vice versa. Audio would free up the mental demands on learners by allowing them to fully focus on the visual as they listen to spoken instruction. It’s a great way to support comprehension and memorization of your demos, while also reducing the need to rewatch portions.
Second, just keep in mind that the sub title placement covers up a portion of your demonstration towards the bottom of the screen, so I couldn’t see how you were tying the hitches until you got to the second hitch of each ladder. It wasn’t a big deal for this, but is worth mentioning in case it is important for other demos to position yourself higher in the video frame.
I don’t know if you plan to make more videos, but spoken instruction might be something you want to consider if you do. I also hope you don’t mind the feedback. You’ve done a great job here. This has been one of the best resources I’ve found for learning shibari. Thank you for sharing your talent with us!
Thank you for your feedback. I’m glad you are enjoying the website.
At the moment the subtitles is a personal choice I make because spoken audio would require a larger workload and these videos are free and make no monetary benefit. I speak English as a second language so I would need to hire someone to do this. If someone wanted to create a voice over for free, I would be happy to host it on the channel. I also got the feedback that many people actually prefer the absence of voice, so I want to continue to create silent version of them. Hopefully one day there are two version of each videos the different preferences.
As for the placement of subtitle, this is a feedback I’m trying to take into account, I’ve tried to improve this for later videos but I don’t plan on reshooting the earlier ones and focus on new videos instead. The placement is also different depending on the device and platform you are watching on, so it’s not a perfect world.
Thank you again for the feedback, hopefully you’ll see the improvements in the upcoming content.