Day 50: Upper Limb Nerves

Nerve damage is one of the most common injuries in rope, it is important to develop a deep understanding of the location of major nerves in order to mitigate the risks when tying and quickly addressing the situation when a problem arises. Knowing the science behind nerves is only a first step, we have to push further as each person is different, and the body evolves with time.
The arms are a particularly interesting part of the body to study as this is where most ties start. Understanding nerve pathways and their function is the most important step in mitigating the risk of nerve injury.
General information about nerves
Nerves run everywhere in the body and transport information between the brain, the spine and the rest of the body in both directions with electrical impulses. Nerves are like a cable, made of several axons (fibres) protected by a sheet of fat and protein. Nerve cells can be up to 1m (3 feet) long. They consume a high level of energy so it is common for nerves to run along blood vessels.
Sensory nerves will bring the information from the body to the brain while the motor nerves bring the information in the opposite direction. Mixed nerves are able to play both roles. For example, when you prick your finger on a needle, a sensory nerve will bring this information to the brain and spine, which will give the order to contract the arm muscle to remove the finger via a motor nerve. Some neural pathways form an arc where an impulse is given without reaching the brain, this is a reflex. Other nerves function without being conscious about them such as the nerves that operate our gastrointestinal system.
Nerves Injuries
Damaging a nerve is the most common of the high impact risks of rope bondage. An injured sensory nerve will create a numb patch while a motor nerve damage will create a weakness or inability to move a limb. The consequences will happen distally to the location of the injury, for example, if you injure a nerve at the elbow, the portion of the nerve in the upper arm will continue to work fine, and the symptoms will manifest in the forearm and hand.
Nerve injuries in rope bondage are usually caused by compression. It can be directly from external pressure (rope or other objects like leaning on something or rope pressing on clothing), or indirectly from the pressure of the body itself. For example, swelling in a muscle or other tissue expanding by trapped blood building pressure in a limb can also press on a nerve. Nerves are also vulnerable to shearing forces, think of twisting spaghettis.
Nerve damage happens outside of rope, walking with crutches, physical exercise, broken bone, weight loss, sleeping in a bad position, repetitive movement or posture can all cause nerve injuries like numb patches, weakness in a limb or chronic pain like the carpal tunnel syndrome. It can be from a single impact, but is more often cumulative after repeated and/or extended pressure.
Nerve compression may come with warning signs such as tingling, numbness, pain, zapping, burning, but often there are no signs at all. It is tricky to identify the signs as they can be very different from one person to another, from one nerve to another, or easily confused with other symptoms like those from restricted blood circulation. Sensory fibres are generally most vulnerable while motor nerves are more sturdy. Tingling and numbness might show up earlier than motor weakness, but they might also all show up at once. The symptoms might also show up after the tie, especially when inflammation and swelling is involved.
In case of injury, we should absolutely not add pressure on the location of the injury, avoid massages and give the nerve the time to rest. Nerves take a long amount of time to heal, and once injured, it might stay vulnerable indefinitely. Permanent damage is possible, but usually, as long as the cell body of the neuron is intact, there is a high likelihood that the nerve will heal. Healing may also be impacted by other conditions like diabetes or thyroid disease.
- Step 1 – Remove the source of the problem – Go smoothly, changing position under compression may add shearing force. Time is key, the longer the compression, the higher the impact. Ask for help if possible.
- Step 2 – Reduce the swelling – If swelling is part of the issue, ice and anti-inflammatory medicine are possible options. Remember that the injury location is “upstream” from the area with symptoms. Some people with pre-existing conditions should avoid anti-inflammatory. Ice used to be the top recommendation but the evidence on its effectiveness is limited.
- Step 3 – Good nutrition to help your body heal – B12 vitamin, magnesium, electrolyte, etc.
- Step 4 – Check with your physician – If things don’t come back to normal quickly, consult a medical professional to get more precise guidance.
The science around what to do in case of nerve injury is constantly evolving, keep your eye peeled for new information.
Upper Limb Nerves and Functions
It all starts at the spine at the neck level, the nerves come out from vertebrae C3-T1. Then they merge in the shoulder/armpit area in a structure called the brachial plexus. The brachial plexus contains three trunks that will split and merge and split again into the different nerves of the upper limb.
The shoulder is a complex articulation that can move in different directions. The axillary nerve (deltoid, tricep, teres minor) is responsible for our ability to lift the arm. There are known cases where high pressure on the top of the shoulder or internal body mechanical pressure to this nerve caused a weakness in lifting the arm. The long thoracic nerve runs along the chest and pulls the shoulder blade down. When injured it causes a syndrome called “winged scapula” where the shoulder blade becomes protuberant.
The supraclavicular nerve may be injured with high pressure to the collarbone in specific positions like the demon pose (tengu), causing a numb patch on the top of the shoulder.
Also in the upper arm, the musculocutaneous nerve (bicep) and the suprascapular nerve (rotator cuff) are not known to be injured in bondage but can suffer from entrapment should there be inflammation in the shoulder region.
From there three main nerves control the rest of the arm: radial, ulnar and median. Any or all three can be injured at the armpit level where it comes out of the brachial plexus. There are several reports of injuries to these nerves at the armpit, most often caused by a cinch pressing on the inside of the arm.
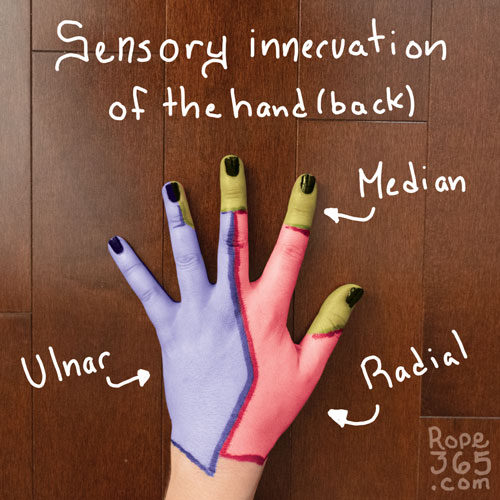
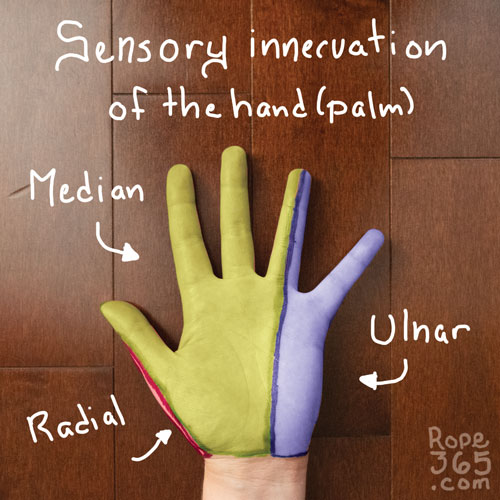
The radial nerve wraps around the upper arm and innervates the forearms that will allow it to open the hand, it then continues as a sensitive branch to the top hand on the thumb side.
The ulnar nerve runs along the elbow to the spot commonly known as “funny bone”, continues it’s path to the pinky side of the wrist and allows the pinky side of the hand to close and move sideways (abduction) and detect sensation on the side of the hand as well.
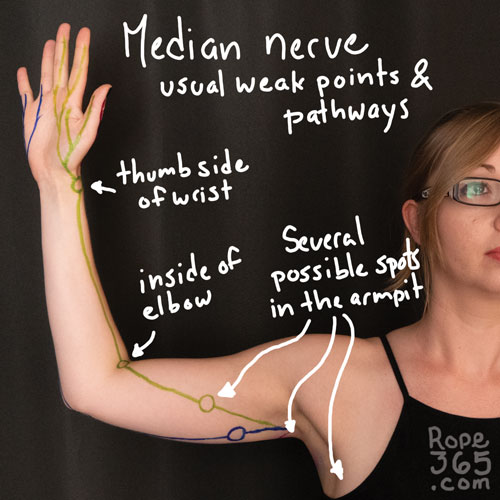
The median nerve runs on the inside of the arm and inside the elbow, then on the thumb side of the wrist. It activates the thumb side of the hand to close and move sideways (abduction).
Overview of the Nerve Functions
| Nerves | Motor functions | Sensitive functions | Notes |
| Spine – cervical C3-T1 | Whole arm and shoulder | Whole arm | If you suspect a problem at the spine, consult a medical professional and check for pre-existing conditions (ex: slipped disk). Protect the neck from sudden movement and bad position. |
| Axillary | Lift arm (abduction) | Lower part of the deltoid muscle | Can be injured with intense pressure on the shoulder, or body mechanical internal pressure. |
| Long thoracic | Pull the scapula down | N/A | Injury to the long thoracic nerve will create a syndrome called winged-scapula. |
| Suprasclavicular | N/A | Top of shoulder | Can be injured with intense pressure near the collarbone in specific body positions. |
| Suprascapular | Arm rotation, abduction | Shoulder joints (no skin sensations) | Unlikely to be injured in bondage |
| Musculocutaneous | Flex upper arm (bicep) | Forearm thumb side | Unlikely to be injured in bondage |
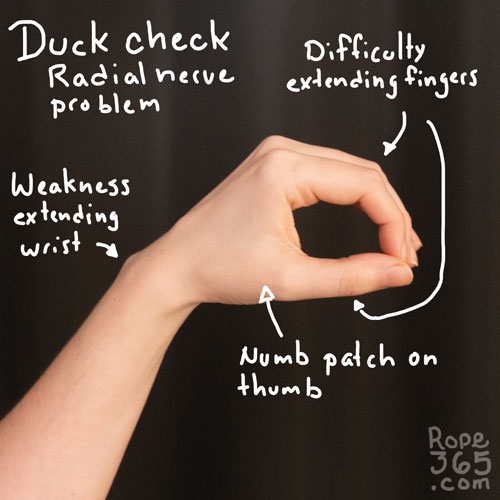
| Radial | Wrist extension, Open hands | Top of hand thumb side | Damage to the upper portion can cause “wrist drop”, damage to the lower on the arms at the wrist or hand will only affect sensation. |
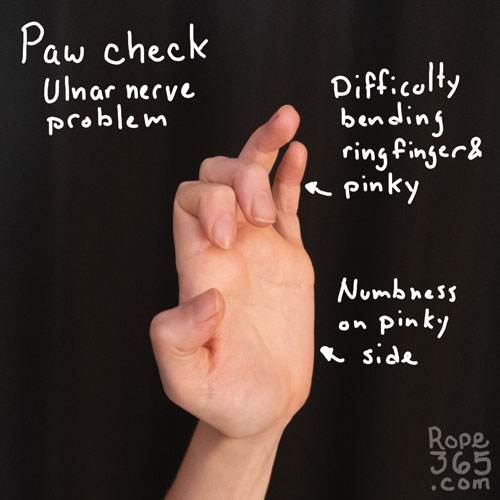
| Ulnar | Hand flex and abduction pinky side | Hand pinky side | Damage at the wrist limits side to side finger movement, damage at the elbow also limits flexion of these fingers. |
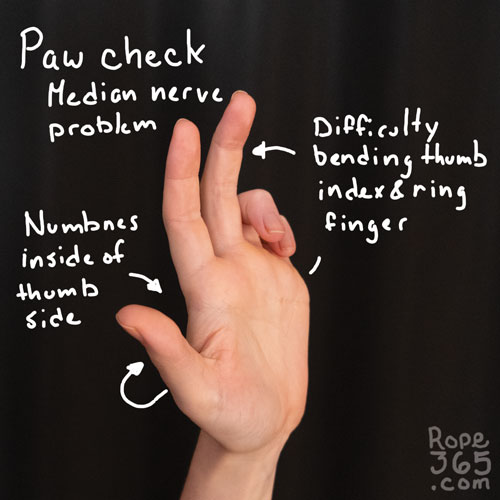
| Median | Hand flex and abduction thumb side | Inside of hand thumb side | Damage at the wrist limits the ability to make a first. |
Upper Limb Nerve Location and Drawing Pathways
Even if we generally have the same nerves, the precise path they take changes from person to person. By combining anatomy knowledge and your body awareness, you can get a better idea of your own pathways with stretches and palpations.
To find exactly where the nerves run for you and your partner, you can apply gentle pressure along the arm and monitor tingles and weakness in the hand to find the spots where the nerves run more superficially. It is usually easier to find the nerve if we engage the muscle around it. Avoid this technique on someone who recently had a nerve injury as pressure may aggravate an existing problem. This procedure is not without risk, avoid sudden pressure and keep it short.
Here are a couple of spots to look for when palpating to find nerve location. It’s very likely that some spots will not work, and you might find new spots for you that aren’t documented. Finding unusual placements is the best part of this experiment. As you get more body awareness, it gets easier to find the nerve location.
Brachial plexus
- On the chest at the top of the armpit
- On the arm where the skin of the armpit folds
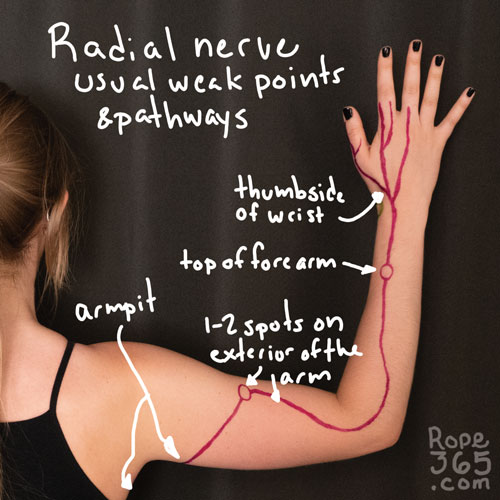
Radial
- Exterior on the arm at the insertion of the tricep, around the base of the deltoid. Usually, one or two spots can be found. Engaging the tricep can help feeling the nerve.
- Center top of the forearm, usually at a third of the forearm toward the hand.
- Topside of the wrist, thumb side.
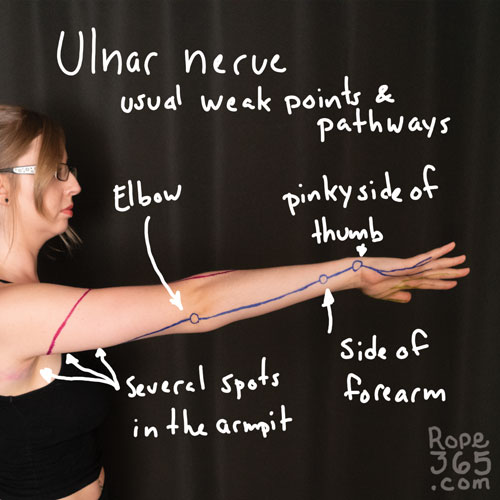
Ulnar
- Look for spots on the back of the tricep.
- Elbow exterior, bend the elbow and look for the funny bone. Usually very exposed on the very tip of the elbow and may continue higher up.
- Forearm, pinky side (more difficult to find)
- Wrist pinky side toward the palm
Median
- Bicep on the inside of the arm.
- Inside of the elbow.
- Wrist thumb side toward the palm.
Nerve Glides
Nerve glides are techniques to position the body so that a nerve is at its full length. As you move into the position, you will progressively feel the targeted nerve pathway and the region of the body related to those nerves. It is also known as nerve flossing and nerve stretching but it is not clear if this moves or stretches the nerves.
These are recommended by doctors to help nerve scar tissues healing and reduce entrapment but don’t overdo them as they can cause irritation to the nerves as well. We list the steps and it’s very likely you won’t need to reach the last one to feel the nerve, no need to go further once you feel it. Keep it light, progressive, and be gentle with your body, especially if you have previously injured those nerves. As you gain more body awareness, it gets easier to feel the nerve pathways.
Radial
- Extend the arm on the side, palm facing down.
- Bend the wrist down.
- Bend the neck, the head to the opposite side.
- Rotate the arm a bit more to the back.
- Feel the nerve along the arm and the top of the hand thumb side.
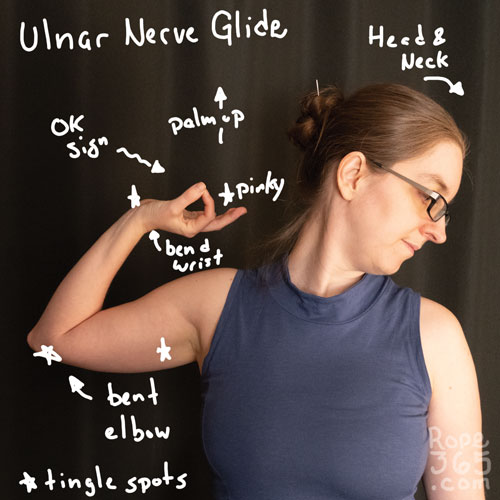
Ulnar
- Make an ok sign with the fingers.
- Bend the elbow with the palm to the sky.
- Rotate the hand to get the thumb toward the skin.
- Bend the neck, the head to the opposite side.
- Feel the nerve in the elbow and the pinky as it gets stretched.
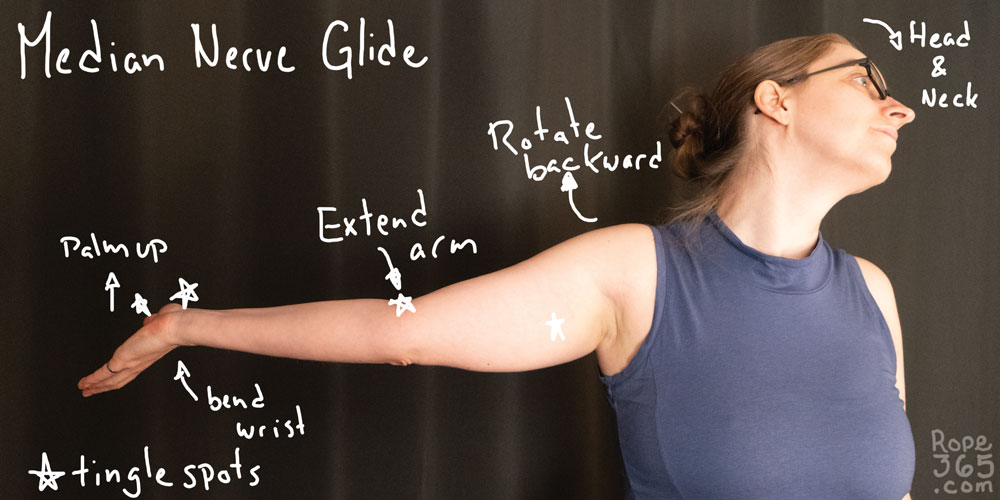
Median
- Arm straight to the side palm to the sky.
- Extend the wrist, pointing the fingers to the floor.
- Bend the neck, the head to the opposite side.
- Feel the nerve at the thumb and along the whole arm.
There are more positions like these, check the reference section for more ideas.

Hand check
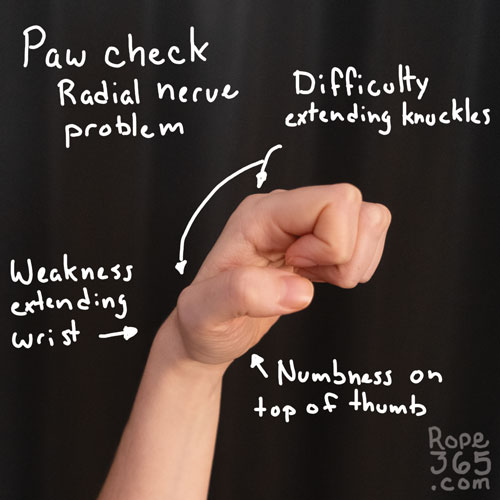
During and after the tie, it is good practice to check that all motor functions are still present. This can be by extending and squeezing with the hands. Discuss with your partner beforehand which hand check technique you prefer, who should be responsible for checking and when. For the monitoring of sensory function, scratching the top of the thumb is a common self-check for radial problems.
Another technique is to do hand positions that require all the nerves to function properly to execute. You should try these positions beforehand as a baseline as not everyone has the same flexibility. Here are some ideas to try:
The Bear Pawn
Extension at the wrist and major knuckle will allow to monitor the radial nerve while closing the other phalanges monitor the ulnar and median.

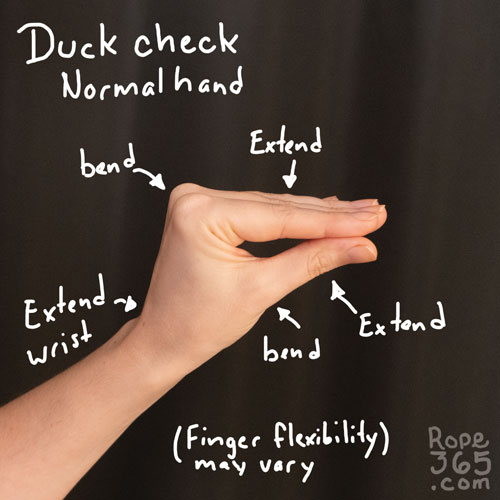
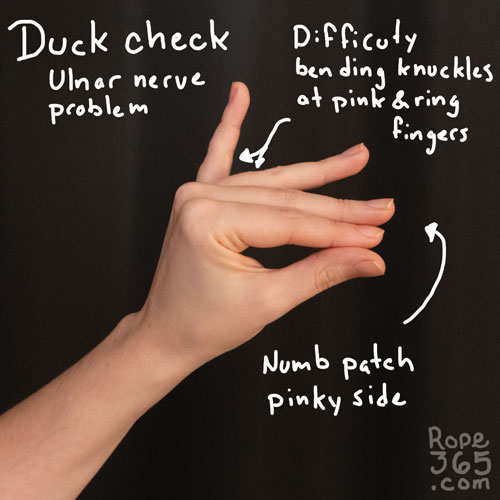
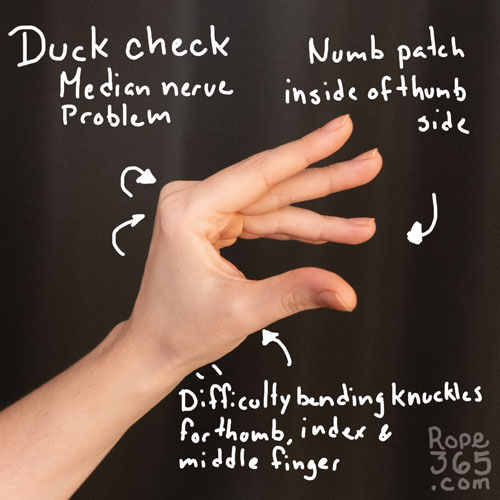
The Duck
Closing the major knuckles allows us to monitor the ulnar and median while tension at the wrist and extension of other phalanges monitor the radial nerve.
Common Ties and Nerve Placements
Different ties will rotate the arm in various positions exposing nerves in different ways. Combining the knowledge of the nerve placement and the possibility of the ties will allow for maximum mitigation.
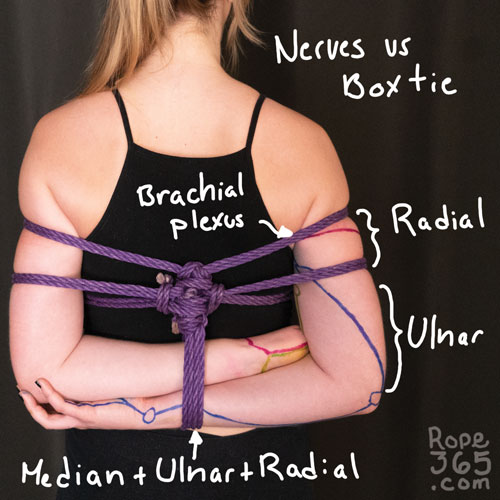
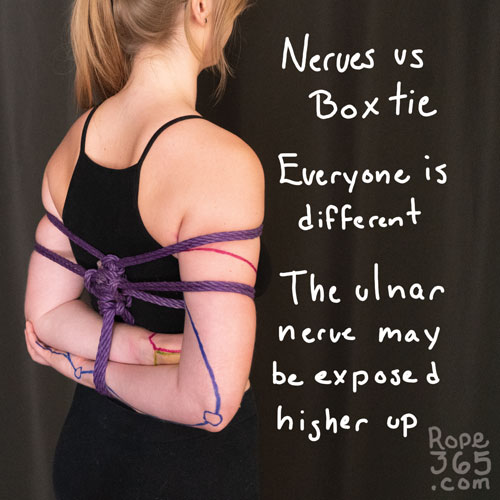
Box Ties
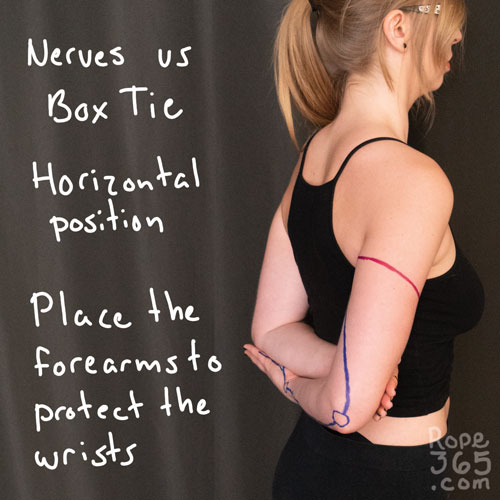
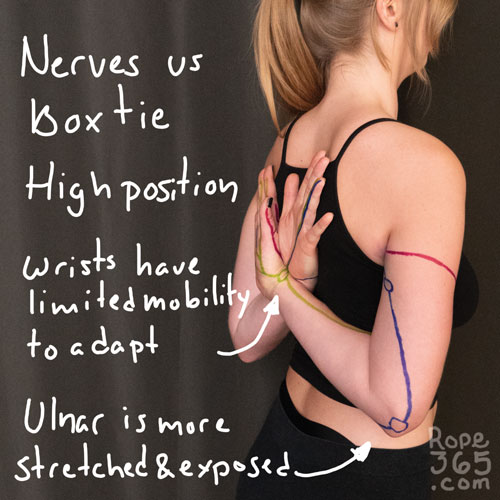
The box tie is a high-risk tie as it can injure several nerves in several locations. The initial single column tie may hit nerves at the wrist. Ideal wrap placement will depend on how high the ulnar is vulnerable at the elbow, and where the radial is exposed on the side. The cinches may also be a source of incident. Depending if the wrists are high, low or in between, the position might stretch the ulnar, and it may be more and less exposed depending on how the bones at the elbow protects it.


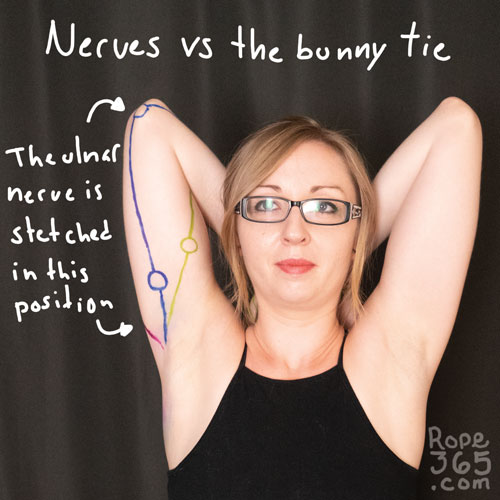
Bunny Ear – Upper Arm of the Riffle Tie
This position will stretch the ulnar nerve at the elbow, pulling the skin up may provide some relief. Avoid pressure on the ulnar and median near the armpit.

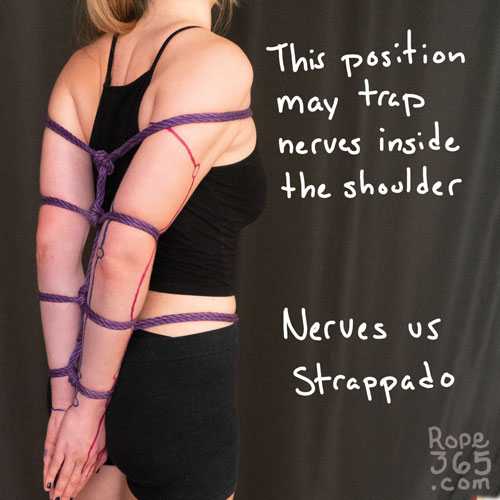
Strappado
Most ties with the arms parallel in the back put wraps in all along the arms so the wrists and elbow are common problematic locations for wraps. The biggest problem with strappado is unfortunately more difficult to see, as we bring the elbows closer in the back, internal body mechanical pressure can occur on the inside of the shoulder. A good strategy is to roll the elbow in when bringing the arms back to prevent bulk in the armpit. A light twist on the bicep may also help to free some of the tension. For most people, this position will be very difficult to hold for an extended period of time and the arms will need to be brought to the front to solve the issues.

Practice Time!
Get some marker pens, find the nerves and draw their path on the body. Use different colours for different nerves.
Exploration ideas:
- Check out different medical resources to get a better understanding of the arm anatomy.
- Try different nerve glides and note the different sensations you experience.
- Palpate the body to identify the nerve pathway and draw the location as you find spots where the nerves run more superficially.
- Try palpating with the arms in different positions.
- Are both sides identical?
- Try different ties and observe which nerves can be hit.
- Try drawing muscles and bones as well.
- Try different hand checks in different positions to see what feels best. How many hand positions engaging the three main nerves can you make?
Inspirations and Resources
- Nerve damage prevention (available in several languages) by Antoine Savalski and Elise Depont
- Nerves and Circulation by Rope Study
- Anatomy for Rope Bondage by IPCookieMonster
- Nerve injury: Treatment & Management (Rope Bondage) by Lightwriter
- Takate Kote Wrap Positioning Survey Results by Topologist
- The Shibari Palsy: An evidence based review and retrospective analysis of radial nerve injuries by —-g—-
- On My Nerves: Moving away from recommending ice for bondage-related nerve injuries by Shayblondie
- Mobilization of the Plexus Brachialis Nerve Branch by Sin (Kinbaku Today)
- Nerve palpation by Zac Cupples
- Incident reports
- Nerve glide videos by Doctor Jo
- Medical videos by Dr. Nabil Ebraheim (check the whole channel for more anatomy and medical knowledge)
- Anatomy/Surgery images for those interested in bondage safety
- Radial nerve compression possibly caused by muscles by MoonlightShadow
- Entrapment: matching nerves and muscles by MoonlightShadow
Credit: Thanks to MissDoctor for her knowledge and support – M: Miss Soffia R/P: Ebi McKnotty
2020-09-12 at 2:22 PM
This is amazingly thorough. Even though I’ve tried to scour every corner of the internet for resources and information on rope safety/risks there is still info here I’d never encountered before. I would appreciate seeing something on flexibility and irritating joints/arthritis but I’m not sure how you’d quantify it or do it well.
Thanks so much for this Ebi
2023-02-05 at 10:15 AM
So glad you enjoyed it. There was a lot of research that went into building this page. And still adding stuff to it once in a while when new information surface. I’m adding information about flexibility in the mobility pages. If we find someone knowledgable about irritating joints/arthritis, I would love to host of link to that information. Not something I’m knowledgable about myself. Thanks for your feedback!