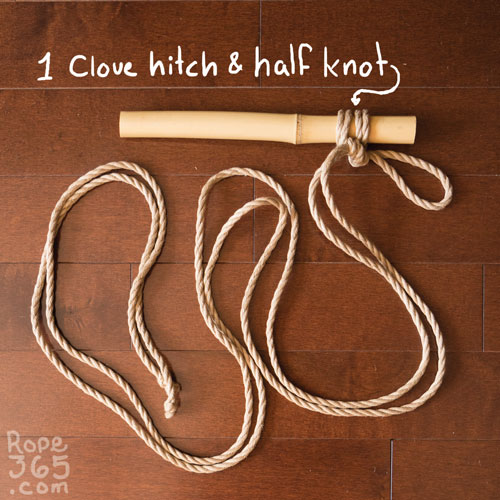
Day 9: Clove Hitch

The clove hitch is the go-to knot to quickly tie off a rope. Also referred to as the double hitch, the clove hitch is a series of two half hitches tied in the same direction (or a single hitch and a half hitch depending on context). On Day 4 we looked at its use as a basic lock using the clove hitch, and it’s such an important foundation, there are more explorations to do with it.
The clove hitch acts like a single column tie, but it tightens and grips as we pull on the tail. This may be unsafe to tie around wrists or anywhere with exposed nerves, but it is perfect to tie on inanimate objects, or on a less vulnerable part of the body that we wish to wrap tightly.
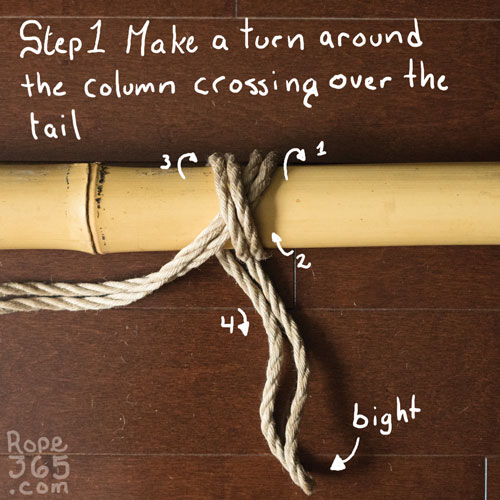
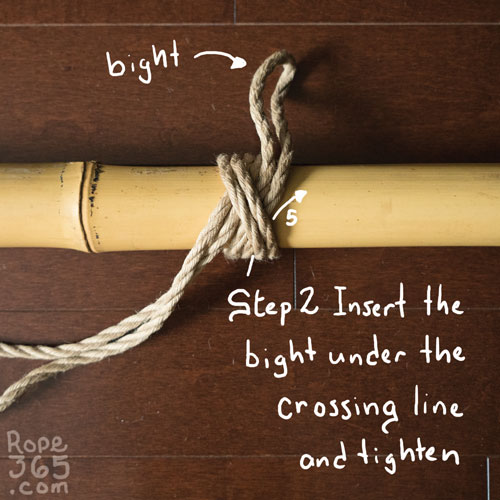
Clove Hitch Threaded with the Bight
On Day 4 we tied the clove hitch with the tail but it is much faster to tie with the bight if the short end is available. I like to visualize the clove hitch as an X with the two ends coming from under the diagonals.

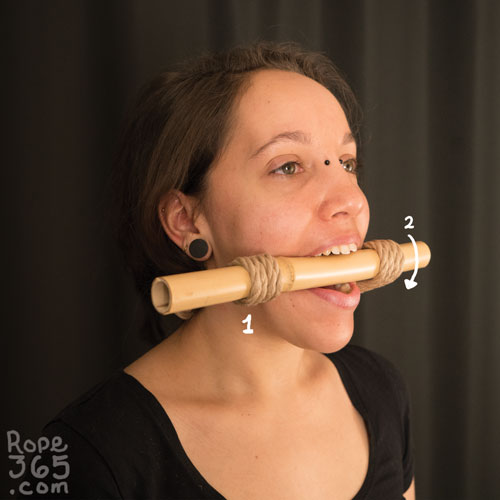
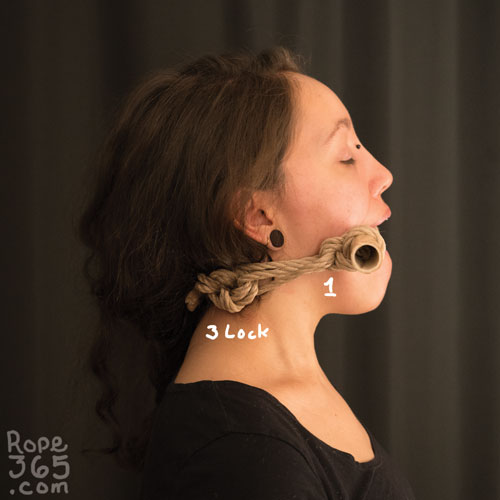
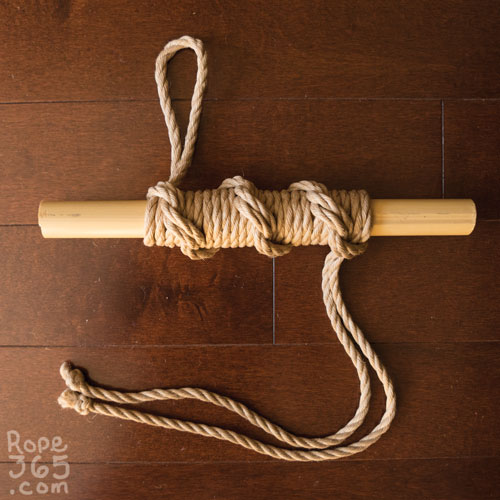
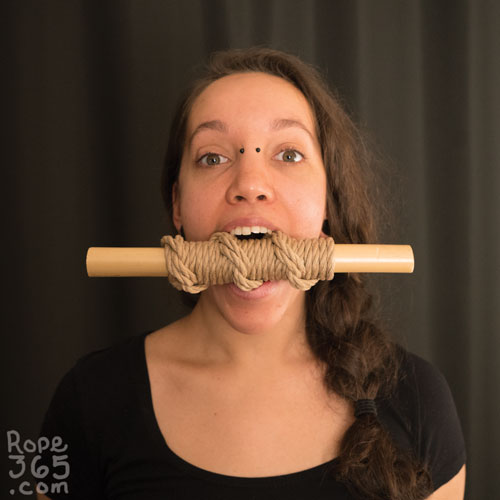
Bit Gag
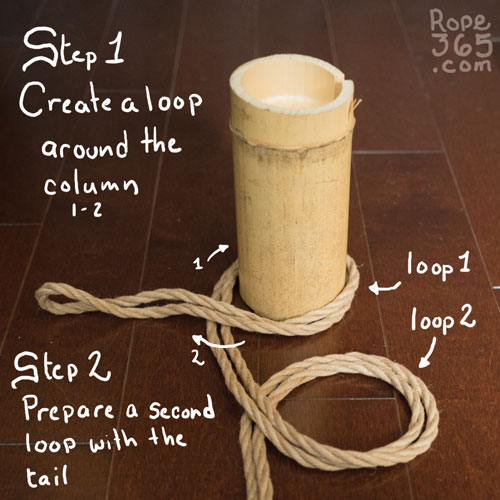
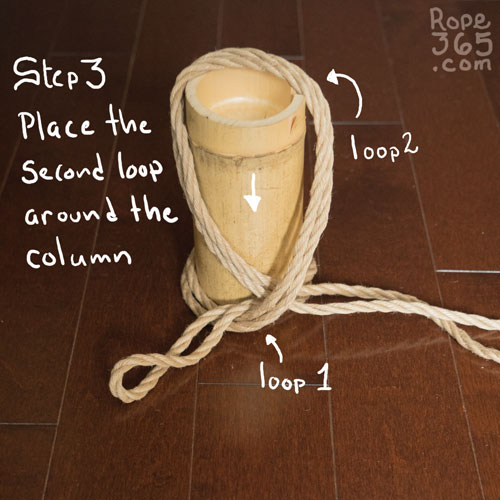
A fun craft project to practice the clove hitch is to make a simple bit gag using a short stick and a short rope.
Clove Hitch Stack
To make a clove hitch using the middle of the rope you need to pull the whole rope through twice but there is a trick to avoid this if the end of the column is accessible. Just create a loop and insert the column into it. You can also prepare the clove hitch in your hand and slide the whole column into it then tighten. This method also works for faster half hitches.
This method makes it a bit more tricky to avoid undesired twists and the tension can be a challenge to maintain compared with threading with the tail.

Stacked Hitch Pattern
An interesting way to drill the clove hitch is to stack many of them using the same technique. This classic macrame pattern can be quite decorative and has a strong structure at the same time. You can keep it straight or naturally let it spin into a helix shape.
Clove hitch will compress the body, choose your placement and tension to avoid nerve or circulation issues. It can be quite pleasurable to compress the calves, and keep it a bit looser when tying the arms.

Practice Time!
Create a tie with a series of clove hitches and compare the different methods to assemble this knot.
Self-evaluation checklist:
- There are no unnecessary twists in the rope
- The rope folds in a way that makes the clove hitches compacted for maximum efficiency
- Each loop is in the same direction (if you change direction, you may have a cow hitch instead, see Day 13)
- Each hitch is of the same level of tension and tightness
The distance between each loop is equal (or of the desired distance) - The location of the hitches align together
Exploration ideas:
- Try the patterns on different body parts
- Try the pattern on inanimate objects such as a pole or a chair
- Include more than one column in the hitch to see what happens when there is space in between.
- Play with the level tightness. Can you make it into a tight compression tie around the calf or a corset around the waist?
- Play with the distance between each loop. Ex: no gap at all, having a gradient of distance
- Play with the change of direction to create patterns. Ex: straight, helix, S shapes
- Look at different macrame patterns that use hitches sequence and try them on the body
Inspirations and Resources
Coming soon!
Credit: M: _Era_ R/P: Ebi McKnotty
Or return to Hitches for more options.
2020-05-09 at 11:52 AM
I never thought about using the clove hitch for a bit gag. That’s a lovely kinky idea. Thank you
2023-02-05 at 10:32 AM
Thanks! I hope you get to enjoy it. Less work than making a hole in the bamboo.
2023-06-26 at 7:35 PM
What size bamboo are you using here 🙂
2023-06-27 at 9:31 PM
The one I used here was around 2-3 cm (1 inch), but you can explore with different sizes.
2023-08-21 at 4:22 PM
I’m been trying to the stacked hitch pattern for a week and can’t figure it out. The one where her whole calf is wrapped. Could you do a video? I tried searching for a video as well. I can’t find one.
2023-08-23 at 7:35 AM
It’s on my list to do a video for this one. The patrons on Patreon are voting on what content should come next and Week 2 came out second (after Chest harness) so it shouldn’t be far down my priorities.
2023-09-16 at 5:52 PM
I was confused at first, too. I tried to do it like in the first pictures with the bight.
I then tried using a single columne tie on one leg and then starting with a half hitch on the other leg (just as in the dreamcatcher pattern last day).
But after the first half hitch I just did more half hitches there and the pattern naturally evolved.
I hope that explanation helps =)
2024-08-08 at 5:40 AM
I am trying to stack the hitches, but I also can’t seem to figure it out.
No amount of zooming in on the pictures seems to help.
Have you managed to record it yet? I see it was brought up around a year ago.
2024-08-14 at 8:21 AM
I haven’t had the chance to make the video yet. Since I make all this for free, I can only produce content at a slow pace. The patrons on patreon vote for the upcoming content and they haven’t voted for this so far. Thank you for your patience.