Simplicity is beautiful; just one rope can be enough to tie someone in the box tie position. Catching the hands first creates the impact of restriction, then the wraps around the torso hold the arms close to the body like a big hug. The name “one rope” is not an absolute. Extend the rope if necessary.
Overview of the Tie
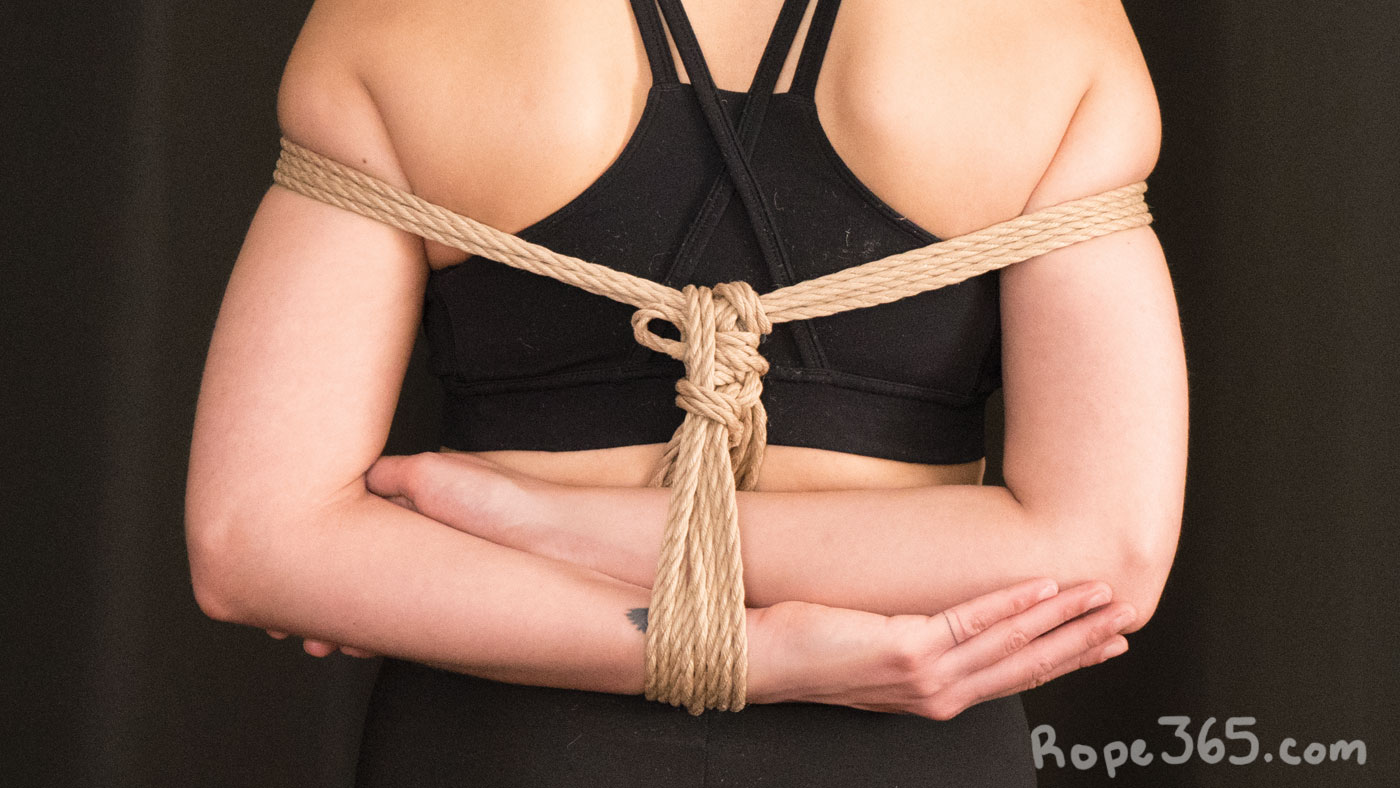
Before starting to tie, let’s have a global view of the tie. The concept is that we capture the wrists first with a loose single-column tie. Then, we wrap the chest to prevent the arms from moving out. This is secured with a friction. The forearms can rest in the single-column tie, suspended to the chest.


This tie require adaptations to the person’s anatomy. If the person in rope is unable to bring the arms in the back, we can start with one wrist; or at the waist and catch both wrists later on. A more difficult approach is to create two cuffs at the beginning of the tie as a starting point.


You can also practice the rope patterns on a chair or on your own legs to practice tension and frictions.
Coming soon – Pictures of self-tied with the legs tied up and with a chair.
Safety for All
The box tie is restrictive without holding the wrists tight. Instead, it prevents the elbow from moving out, keeping the hands behind the back. The biggest downside of the box tie design is that it is prone to cause injury when a lot of tension is added to it. Incidents are uncommon outside of suspension, but it’s great to develop good habits when first learning this tie.
Hand sensations and movement (closing and opening hands) should be continuously monitored to ensure everything is in working order. Good placement of the single-column tie and chest wrap will contribute to reduce the risks.
- Wrist/hands – The rope pressure should be on the forearms. Avoid pressure directly on the wrists or hands. The person in rope can try different positions of forearms to find what is most comfortable for them. For people with limited shoulder mobility, you can start at the waist or with a single wrist.
- Upper arms – By poking the arm’s exterior, you’re likely to find one or two soft spots at the base of the deltoid that may cause pain or discomfort. Placing the wraps above this spot, on the bottom third of the deltoid, will make the tie more safe and sustainable. Make sure you don’t put the wrap too close to the top of the shoulder. Otherwise, the rope might slide toward the neck.
- Risk profile – if you’re completely uncomfortable with the risk of nerve problems and/or rope sliding to the neck, you can do the wraps on the chest and completely avoid the upper arm.
- Pre-existing injuries – it’s quite frequent for people to have problems with shoulders or other joints. If it’s just one side, you can do an asymmetric tie and secure the other arm separately. Each injury is unique and will require creativity to adapt.
Again, these tips can only help mitigate the risks. Continuously monitor hand movement and sensation while the tie is on. A common tip is to scratch the palms and the top of the thumb to monitor the first signs of sensation loss. Be ready to untie quickly and cut the ropes with control in case of emergency. Fell free to skip ahead and read more about nerves in Day 50.
X Friction Chest Wrap
Different frictions can be used to lock the top wrap. This variation uses an X Friction, it is inspired by the style of Nawashi Akechi Kanna 縄師神凪 and their teacher Akechi Denki 明智伝鬼 (1940-2005). Something unique about this style is the inclusion of the bight in the X friction to make a stronger stem.
Here, we start with a square knot single-column tie out of tradition, but most single-column ties with two or three wraps will work.


Finishing the Tie
Once the pattern is completed, an easy option is to make a lock and use the remaining rope as a leash. There are also a few elegant ways to use up the rope we have left, depending on the amount remaining. With a lot of rope, wrapping around the chest or waist is a good option to waste rope quickly. Another great option is to wrap around the wrists to add support.


Variations in Position
If the term “box tie” generally refers to the horizontal position of the forearms in the back, the same structure can be used with the wrists at different heights in the back. These will affect the tension in the shoulder, the angle of the elbows, the space between the arms and the body, creating a very wide range of feelings and sensations.
Each body is unique, and exploring the box tie also means discovering how to better adapt this tie to the person in rope. Length of arms, flexibility, pre-existing injuries, personal preference on where it feels good to have pressure, and so many other factors. The best is to explore and see what works best for you.
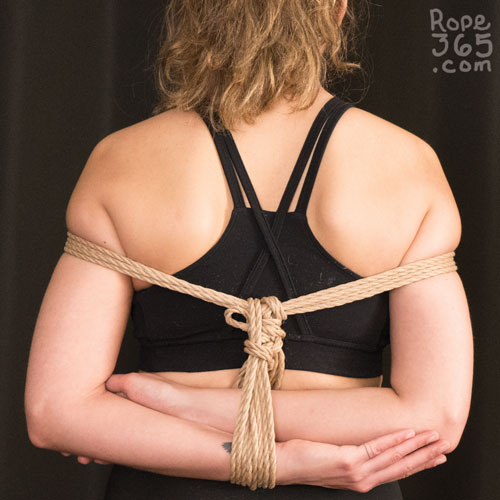 Horizontal – The basic position is to have the forearms horizontal in the back with a single-column around them, with no direct pressure on the wrist joints nor hands. If the person in rope is comfortable, awesome! If they’re not, or you just want to try different options, keep reading. Horizontal – The basic position is to have the forearms horizontal in the back with a single-column around them, with no direct pressure on the wrist joints nor hands. If the person in rope is comfortable, awesome! If they’re not, or you just want to try different options, keep reading. |
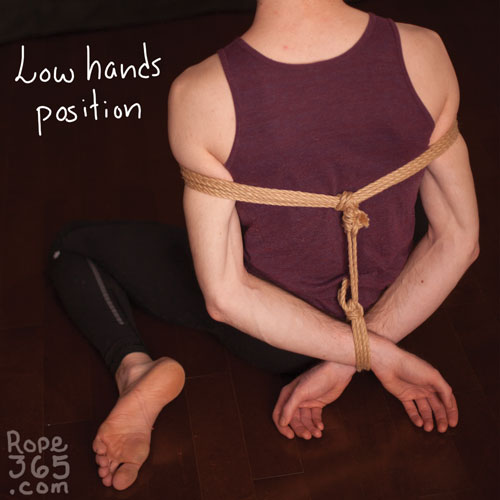 Low wrists – Keeping the wrists low, toward the butt, will lower the stress on the shoulder, open the angles of the elbow, making it a more sustainable and accessible position. The feeling of restriction can also be increased as these angles allow the upper arms to be pressed closer to the body. The low positioning of the wrists brings the elbow in behind the back with an aesthetic that preserves the line of the hips when looking from the front. Low wrists – Keeping the wrists low, toward the butt, will lower the stress on the shoulder, open the angles of the elbow, making it a more sustainable and accessible position. The feeling of restriction can also be increased as these angles allow the upper arms to be pressed closer to the body. The low positioning of the wrists brings the elbow in behind the back with an aesthetic that preserves the line of the hips when looking from the front. |
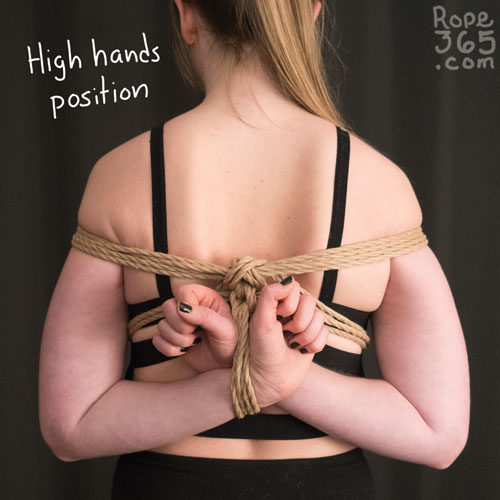 High wrists – Bringing the hands high in the back is a different challenge. It will put a lot of stress in the shoulder joints. Most people cannot reach this position, but some prefer to feel their shoulders fully locked. As the wrists are raised, the elbows are brought out, then back in. The wrists make a cross, the hands become a bow, and the feeling of helplessness increases. Both the aesthetic and the sensations of this position are unique. High wrists – Bringing the hands high in the back is a different challenge. It will put a lot of stress in the shoulder joints. Most people cannot reach this position, but some prefer to feel their shoulders fully locked. As the wrists are raised, the elbows are brought out, then back in. The wrists make a cross, the hands become a bow, and the feeling of helplessness increases. Both the aesthetic and the sensations of this position are unique. |
 Split wrists – Many people are uncomfortable or unable to bring their arms together. There are many alternatives to tie the wrist in to get a similar impact while respecting the body’s range of motion. Split wrists – Many people are uncomfortable or unable to bring their arms together. There are many alternatives to tie the wrist in to get a similar impact while respecting the body’s range of motion.
These changes will also impact the restriction on the body. We have to be more careful as we tie the wraps to make sure the shoulders are in a good, stable position. Open the chest and bring the shoulder blades together as you make the wrap on the top of the best to stabilize the shoulders. |
 Reversed – The tie can be flipped to have the hands in front, but then the tension in the body is quite different, and the restriction effect will not be as strong. You will have to add more ropes pulling in different directions to make the position restrictive. Reversed – The tie can be flipped to have the hands in front, but then the tension in the body is quite different, and the restriction effect will not be as strong. You will have to add more ropes pulling in different directions to make the position restrictive. |
Arm Placement
It is challenging for most people to maintain a position with their hands in the back. The main limitation is usually tension in the shoulders, which tend to get quite stiff in the modern lifestyle. Warming up and massaging can help get some mobility back. Regularly stretching the shoulder and improving your posture are great long-term solutions to keep your body in good shape and prevent injuries.
To increase sustainability, we can place the shoulder joint at an angle that will minimize the tension in the body. Different people will have different preferences, depending on how high you wish to place the wrists in the back. It’s very likely you will realize you are more flexible than you thought when you find the right position for you. This will require some practice, and is easier with a partner to help guide the body in the different positions. If you are helping a partner, use a gentle force only; we are working with the body, not against it.
Compare these different approaches:
- Front position: roll the shoulder to the front, pull the arm down, maintain the pull as you bring up the wrists behind the back, bend the elbow and rotate the forearm as you bring them backward. This position is often preferred to bring the hands higher in the back.
- Back position: roll the shoulder to the back, pull the arm down and bring the wrist to the back while keeping the tension toward the back. This position is often preferred by people with a higher range of motion.
- Neutral position: don’t do anything special. Let the body naturally set itself into place. For some people, this will be preferable to forcing the shoulder in any position.
If any position doesn’t feel right for you, you don’t have to endure something that feels off for your body. As you continue exploring with mobility, you can revisit these positions from time to time to see if they feel different.
Coming soon, pictures of arm positions
Design Variations
Even with such a simple design, there exist many structural variations.
- Reverse tension – Some will prefer to do a reverse tension between the two passages of the top wrap. This makes it easier to have the stem in the center and affect the direction of tension between the two wraps.
- Bight in stem – If the bight of the single column tie is longer, it can be hidden inside the stem by embedding it inside the different frictions. This has the upside of creating a sturdier stem and the bight can be used as a structural tying point but makes it more difficult to untie the wrists in case of emergency.
- Frictions – There is an amazing number of frictions that can be used to make a T-shaped frictions, you can design your own. We’ll look into more friction variations in Day 204.

Mynx’s One Rope Box Tie
To get a deeper look at the variety in the variations of this tie, it is interesting to look at the work of different artists. Mynx’s interpretation of the box tie is influenced by her teacher Naka Akira 奈加あき, who is inspired by Nureki Chimuo 濡木痴夢男 (1930-2013). Different techniques and aesthetic choices will create a tie that both look and feel different.


Practice Time!
Create a box tie starting at the wrists and making a wrap around the whole torso above the pectoral muscles.
Self-evaluation checklist
- Starting point
- The single-column knot is tight and stable
- Pressure is on the forearms (away from the wrist joints) or waist
- 2-3 cm loose.
- The knot is on top, toward the wrap.
- The stem
- Straight and centred
- Tensioned, the person tied can rest their arm comfortably on the starting point.
- The wraps
- All ropes in the wrap are of equal tension.
- The friction is compacted and strong.
- The wraps aren’t sliding toward the neck.
- The wraps are an equal distance from the shoulders on both sides (or uneven on purpose to adapt to the person’s needs and preferences).
- How does the placement feel?
- Grab the middle of the wrap in the back and gently pull in different directions.
- The rope is back to its initial placement and tension after you let go.
- How does the tie feel?
👤 Solo, you can practice the wrap and friction in many ways
- Level 1: use a chair or stuff a hoodie with towels to make a dummy and try the pattern
- Level 2: use your own body. Start on your waist, and use your chest (without the arms) or your legs to practice the wraps and friction.
- Level 3: reproduce the tie on your own body, including the arm. Pro tip: you can slide the wrists in at the end. Make sure you have a spotter to get you out.
- Coming soon, picture of self-tie at levels
👥 With a partner you can do this tie properly. Take the time to figure out the arm and shoulder placement preferences of the person being tied. It can be a very connective tie if you maintain even tension as you wrap the chest.
🏠 As a group, it is interesting to compare the preferences of different people and how it look with different body proportions and shoulder flexibility.
Deeper Dive
Since this is a classic, every school will have its own variation. Almost every step of this tie can be done in a different way for different intentions. There are a few alternatives you can explore
- Try variations of the single-column tie (direction of rope, type of knots).
- Start the wrap left or right?
- Wrapping always in the same direction or reverse tension?
- Try different frictions
- Try different amounts of rope in the wrap.
- Try different placement
- Do you prefer to keep the bight loose or include it in the stem?
- Do you prefer the back of the wrap to be perfectly horizontal or more in a V shape?
- Do you prefer the front of the wrap perfectly horizontal, or more in a round shape?
- What to do with the remaining rope? Leash, cuff, more chest wraps, bundle, decoration?
This tie also benefits from a deeper understanding of nerve placement and body mechanics. We’ll explore these topics in upcoming chapters
Inspirations and Resources
- Is the TK dangerous by WykD Dave
- TKs: An Extended Look by Sasori_D
- Three rope safety notes by Cannon
- Takate Kote – First Rope by Anatomie Studio
- How To Tie A Boxtie (TK) by Bondage Tuition
- Videos by 鵺神流 (Yagami Ren)
- Videos by kamui jyubei
- 超簡単解説‼︎‼︎胸縄を覚えたい人!先ずはこれから!【胸縄 横縄編】 by kinbaku studioJP 1
- Videos by MrLuckiesRope
- Videos by Yukinaga Max
- Videos by Esinem
- Videos by Haven Kink
- Videos by Nawakiri Shin & Kichiku Girls
- 後手縛り飾りメドレー12種!by 天馬ハルと翼裕香の縄縛TV
- Shibari Gote / Takatekote by Voudou Ropes
- Videos by Belle
- How to Tie the Takate Kote TK Kinbaku Bondage by Amanda Pasciucco
- Performance TK takate kote by Giotto
- M0coJute Box Tie by M0co
- How To Tie Rope Without A Partner | No model? No problem! By Shibari Study
- Videos by EpicRope
- The Back-Arm Harness by KINKFINITY Chanel
- Videos by Better Call It Art
- Gote Shibari by TheDuchy
- Gote aka takate kote by La quarta corda
- Adapting basic chest harness and box ties with Midori by TwistedMonk
- How to tie a 3 rope takate kote boxtie by MasterFtt
- Simple Chest Harness (Box Tie) by Be Touched Community
- Videos by MiShibari
- Шибари. Грудная обвязка ( 2TK) by Арсений Назарук
- Videos by 绳师48号
- Photo by Yagami Ren 1 2
- Photos by Kolker
- Photo by The_Silence
- Photo by Anna-Bones
- Photo by ElisaT
- Photo Wykd_Dave
- See more box tie videos beyond this topic on the Rope365 Youtube playlist. Note that video references may display risky or unstable techniques, viewer discernment is advised.