We can expand the box tie design with more rope to create a sturdier structure. Having more frictions and more wraps will help the tie stay in place and spread the load for a safer experience. This is especially useful for more intense play sessions as attaching another body part to the structure or anchoring it to furniture or other hardpoints will add additional forces.
This tie is often referred to as the two-ropes box tie, but the actual amount of rope used may vary depending on rope length and the shoulder width of the person being tied. Usually a second rope between 7-8 meters will be sufficient. Having a short rope to finish up may be handy.
Overview of the Tie
This second rope continues from the structure we learned in the previous lesson. From the top friction on the stem, we have the option to add cinches on the top wrap whose goal is to prevent the top wrap from moving toward the neck.
Then a second wrap lower on the arm and under the pectoral will make the tie even more restrictive by preventing the elbows from moving out. Adding cinches to this lower wrap really stabilizes it and makes the tie more snug, stable, and less escapable. Note that the second wrap cinch is not optional like on the first one, as it is essential to make the structure stable.

Coming soon, updated picture with information on the different parts of the tie.
- Starting point
- Top wrap
- Lower wrap
- Stem
- Top cinches (optional)
- Lower cinches
To practice the tie without having to worry about stress in the shoulders and/or nerves in the arms, you can make this pattern as a chest harness. Choose your own adventure to include the wrists or start at the waist.


Coming soon, pictures of this tie as a chest harness starting at the waist.
Safety for All
As we continue the pattern, the safety of the box tie becomes a bigger challenge. More rope means more spots we can hit and more rope that needs to be removed in case of emergency. A more complex tie also means more requirements to adapt the tie to the person in rope.
Continuous monitoring of hand sensation and movement is essential to mitigate nerve issues. The risks at the wrists and at the base of the deltoid from the first rope are still present. With the second rope, we add risk of injuring the brachial plexus in the armpit and the ulnar nerve in the elbow. By tying loosely and avoiding bulk between the arm and the chest, we reduce a lot of those risks. With experience, you’ll also find the best placement for the person in rope, each person is unique. Fell free to skip ahead and read more about nerves in Day 50.
Cinches on the top wrap are a trade when it comes to safety. Preventing the rope from moving to the neck is an important function. But this cinch rope is also likely to hit the nerves exposed in the armpit. The decision to add it or not depends on a few factors, like the anatomy of the person being tied and the intentions in the type of play.
Avoid cinches on the upper wraps if:
- There is no gap between the arms and the chest below the armpit. Especially when the body is a bit wider at the shoulders than at the chest level, naturally preventing the rope from sliding upward.
- The movement in the tie will be limited.
- All tension on the structure will be pulling downward.
Consider adding cinches to the upper wrap if there is a significant risk of sliding toward the neck
- The shoulders are round, making the wrap likely to slide. Usually, if the elbows stick out a little bit, they will also have more space at the armpit, which helps reduce the nerve risk.
- Anticipating lots of movement in the tie.
- Tension on the structure may pull upward.
Make sure the tension of the upper wrap is high enough that slippage is mitigated. This may be more difficult with stretchy rope. Even with cinches, we don’t want them to dig into the armpit. Top cinches should be kept loose to prevent movement, and not add additional tension.
Coming soon, pictures of people with different anatomy to show different cinches options.
The position itself also builds stress in the shoulders. Finding a comfortable arm placement is the starting point. As one stays in the tie for a longer period of time, it is important to stay ready to untie quickly or cut the person out of rope if necessary.
The steps to create the tie will be different with other design variations, and they may have different ways to address each risk. Make sure you have a deep understanding of the function of each part before mixing and matching box tie designs.
Square Friction Two Ropes Box Tie
Just like with the first rope, different frictions and techniques can be used to create the lower wrap structures and the cinches. Here we use a friction similar to a square lashing, the same technique to tie two poles at an angle for scaffolding. It bears many other names such as two half moon, full moon or 太鼓留め taikodome (drum knot). This design is inspired by the style of Nawashi Akechi Kanna 縄師神凪 and their teacher Akechi Denki 明智伝鬼 (1940-2005).
For simplicity, we don’t repeat the steps of the first rope. Refer to Day 29 for review.


Extending Rope Safely
If you start from a finished one rope box tie, you can just start with an overhand knot or a lark’s head on the stem. But if you’re adding both ropes in a sequence, it’s much faster to extend the rope.
Joining a new rope adds a little bulky part that may create pressure, which adds to the risks of the tie. Depending at what point the rope starts to be short, you’ll have a choice to make. It is better to have a bit of rope to waste than to cause an injury. It also depends on what you plan to do next. If you are only briefly practicing, creating a pretty picture or playing heavily with the tie, you might make different choices.
- Don’t
- Extend the rope between the arm and the torso: many nerves are exposed at the armpit and below.
- Arms: some nerves are vulnerable. Lying on the ground with the bulk of an extension pressing in the arm will be uncomfortable and may cause injuries.
- Avoid
- Front of the body: can cause some discomfort and break the aesthetic.
- Stem: bulk near or within the frictions can make them more difficult to compact, leading to a weaker stem. Extensions also get in the way of connecting other parts of the tie to the structure.
- Best
- Anywhere in the back away from the stem is a great place to extend. Unlikely to cause injuries or discomfort, extra rope can easily be used to add support, restriction or decorate the back of the tie.
Coming soon, visual indication of where to extend safely.
Tension and Placement
Finding the right tension and placement will help make the tie more sustainable and safer for more intense play. First, you’ll want to nail the placement of the top wrap on the lower and tie it with a lot of tension to reduce risks of slippage. This allows to anchor the tie on the strongest part of the chest. The lower wrap should be tied more loosely as the lower arm and lower chest are softer parts of the body.
The placement of the lower wrap is also tricky. The ulnar nerve is often exposed at the elbow (the spot commonly referred as “funny bone”). To avoid hitting that nerve, we want to tie as far as possible off the elbow while not pressing on the radial pressure point at the base of the deltoid. For most people, you’ll want to place the second wrap right under the first and deflect under the pectoral. For others, it will feel more comfortable to leave a little gap. Some people won’t be able to tolerate rope on the lower arms at all, and it’s better to do a wrap on the chest instead. The tension of the lower wrap should also be slightly looser than the top wrap to mitigate nerve issues.
Coming soon, pictures of different placement, close, gap, and hybrid chest harness.
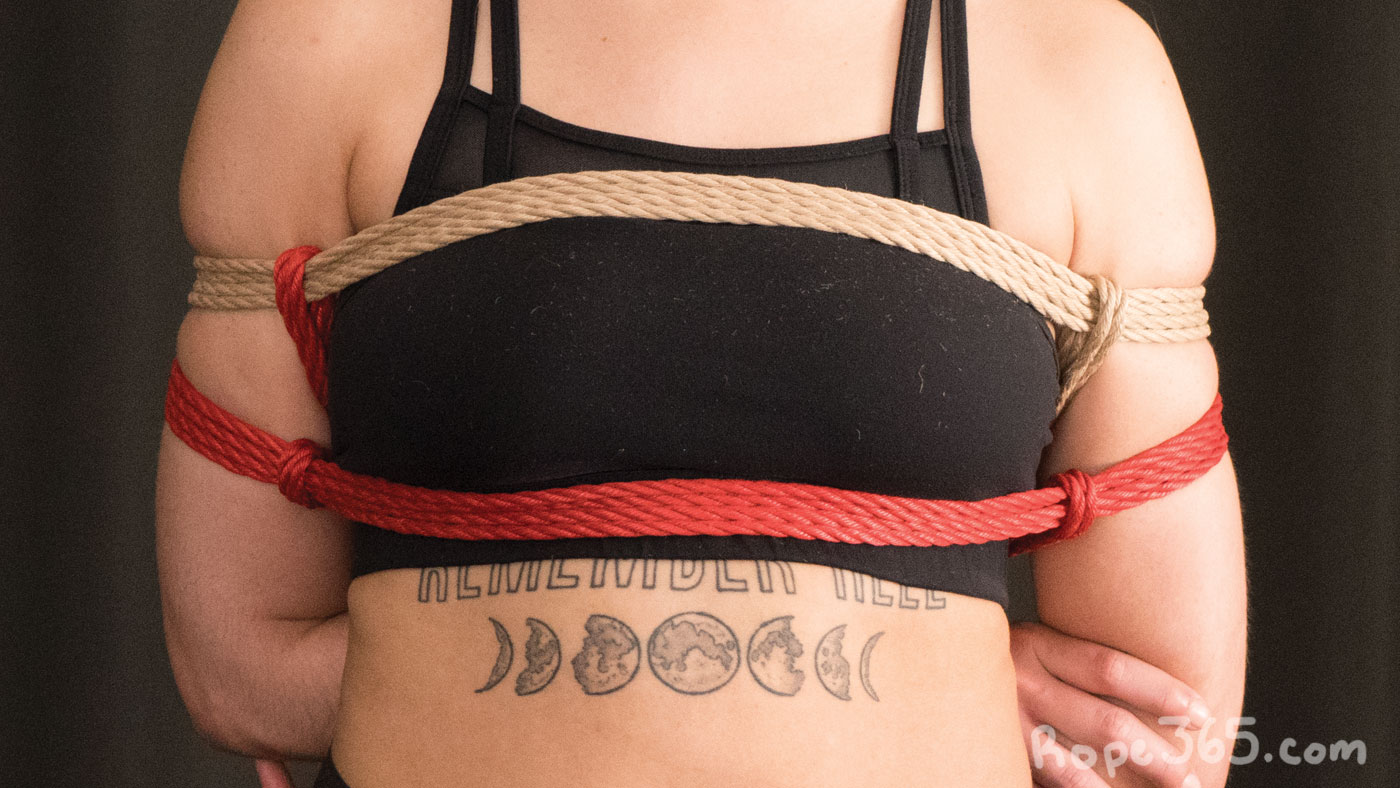
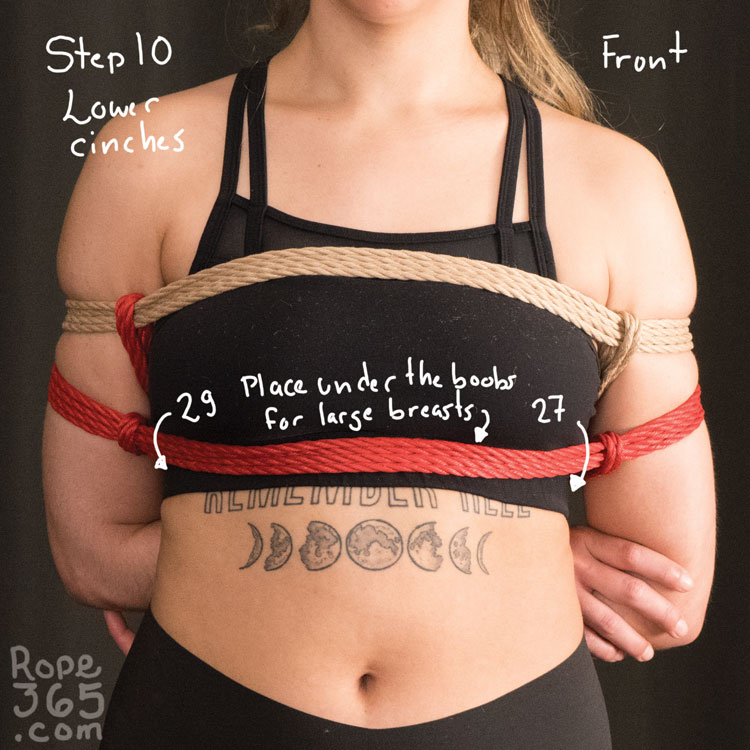
The front part of the lower wraps should placed on the base of the pectoral for more confort. This means lifting the breast or chest tissue if any to avoid pinching the skin under it.
We also want to be mindful of tightness on cinches. For the top cinch (if any), we want to add absolutely no tension to the upper wrap. This one only acts as a safety mechanism and we don’t want to add extra pressure in the armpit. The cinches on the lower wraps are a bit different. We should add a bit more tension to shape the wrap to follow the curves of the body. To avoid pulling in the cinch during play, we leave the rope connecting each pair outside of the stem, along the back.
Finishing the Tie
We can lock off the tie in various fashions. Here we use an L friction and a half hitch to create a symmetrical shape. From there, you can be creative with the rest of the rope. Wrap around the wrists, the chest, the waist, or if you have a lot of rope, continue toward the front of the chest.

Coming soon – Updated picture with L friction lock
Stretching the Shoulders
This tie creates a lot of stress on the shoulders. Once untied, it can feel great to stretch, especially with the help of a partner. Slowly bring the arms parallel in the back and turn the palm facing out by rotating the thumbs outward. Then, gently bring the wrists towards each other and lift away from the back, respecting the limits of the body. Hold for a few breaths and slowly release.
Coming soon pictures of partnered stretch.
Design variation
As the design gain in complexity more opportunities adds up for design variations:
- Cinches – The decision to use cinches on the upper wrap is probably one of the most important variations as it affects the safety of the tie and different anatomical proportions will yield different results. There are other decisions such as tying the cinches upward versus downward that will change the flow of tying
- No extension – Instead of extending the rope, we can start from a finished one rope box tie and tie a new rope on the stem.
- Stemless – To create a more sturdy stem, we can make a larger friction over both the lower and upper wraps. This is often used when not using upper wrap cinches to help keep the upper wrap downward.
- Frictions – The cross shape of the lower wrap friction allows for different design of frictions. We’ll look into more friction variations in Day 204
Mynx’s Two Rope Box Tie
Let’s continue to look at diversity in design with Mynx’s interpretation of the box tie. The differences are visible from the very first moment of the tie as it starts with a new rope instead of extending the previous one and from there every single friction and passage is different, yet the global structure and logic is similar.


Practice Time!
Create a box tie that has both a wrap above and under the pectoral muscles.
Self-evaluation checklist
- Top cinch (optional)
- The rope runs very flat in the armpit. Use a finger to make sure there are no unnecessary twists in the rope in the parts that are not visible
- The top wrap must be low enough so that the cinch won’t push upward in the armpit
- No tension added on the top wrap
- The rope between the cinches runs flat against the back.
- Lower wrap
- The tension is lower than the top wrap
- All ropes in the wrap are of equal tension
- The wraps have a symmetrical placement on both sides (or to the preference of the person in rope)
- How does the placement feel?
- Lower cinch
- The cinch adds a little bit of tension for the rope to follow the shape of the chest and arms in front
- The rope between the cinches run flat against the back.
- Stem
- The frictions are compacted and strong
- The stem is straight and tensioned
- All the frictions are stacked nicely with no gap between them
- The checklist from the first rope in Day 29 still applies
👤 Even without a partner, you can practice this tie. On objects (chair, dummy) or on yourself with the chest harness variation. Challenge: can you self-tie this pattern, including having the wrists in?
👥 Creating this tie as a team in a safer way requires communication and partnership to figure out the right placement and adaptation. It also takes a bit of patience as we learn the techniques and try different options.
🏠 As a group, you can compare the different preferences in placement and other adaptations. Did someone come up with something clever for others to share?
Coming soon, pictures of solo exploration
Exploration ideas
- Add the second rope
- …at the end of the first rope
- … by tying it directly on the stem
- Try different placements of the second wrap, which one feels better
- What are other ways to prevent the top wrap from sliding up without going in the armpit?
- What are the most efficient ways to get rid of the rope at the end? Can you use it in a meaningful or playful way?
Pro tip – Go for the big gap
When tyng the cinches, it get can difficult to slide the rope in a tight gap. A great trick is to pull the rope closer to the elbow where the gap is bigger. Once the rope is through, you can slide it up to the correct position without creating bulk in the armpit.
Inspirations and Resources
- Is the TK dangerous by WykD Dave
- TKs: An Extended Look by Sasori_D
- Three rope safety notes by Cannon
- How To Tie A Boxtie (TK) by Bondage Tuition
- Kannuki Shibari by 鵺神流 (Yagami Ren)
- Videos by kamui jyubei
- 超簡単解説‼︎‼︎胸縄を覚えたい人!先ずはこれから!【胸縄 横縄編】 by kinbaku studioJP
- Videos by MrLuckiesRope
- Videos by Esinem
- Videos by Haven Kink
- Videos by Nawakiri Shin & Kichiku Girls
- How to Tie the Takate Kote TK Kinbaku Bondage by Amanda Pasciucco
- Performance TK takate kote by Giotto
- How To Tie Rope Without A Partner | No model? No problem! By Shibari Study
- Basic Box Tie by EpicRope
- Gote Shibari by TheDuchy
- Gote aka takate kote by La quarta corda
- Shibari Gote / Takatekote by Voudou Ropes
- Videos by Better Call It Art
- Videos by MiShibari
- Шибари. Грудная обвязка ( 2TK) by Арсений Назарук
- Videos by 绳师48号
- How to tie a 3 rope takate kote boxtie by MasterFtt
- Photo by Mistress Chiaki
- See more box tie videos beyond this topic on the Rope365 Youtube playlist. Note that video references may display risky or unstable techniques, viewer discernment is advised.
Credit: Two full moon box tie design inspired by Akechi Denki and Nawashi Kanna, M: _Era_ R: Ebi McKnotty P: AlexK7 – Mynx box tie – M: -BOP- R: Mynx P: Ebi McKnotty
One more typo: “tie as far as possible of the elbow”
Thank you, this was fixed!