
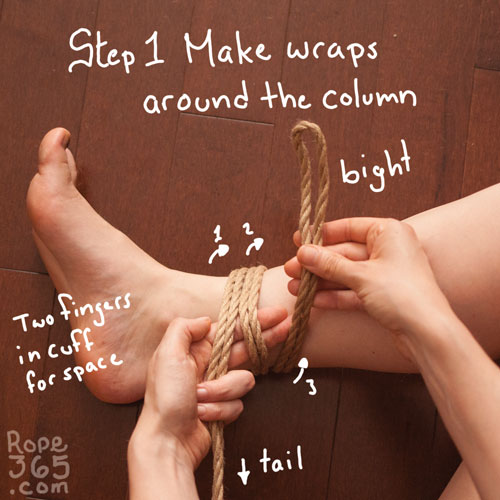
Most ties start with a single column tie, it is the first anchor to the body. A single column tie is a cuff that will not tighten when we pull on the tail. “Column” refers to anything you can tie around: a leg, a torso, a bedpost etc.
It is recommended to know fewer knots very well and master them before learning more. We start with the Somerville bowline, one of the many variations of single column ties. If you have already adopted another knot, it might be wise to practice the one you know and save the Somerville bowline for later.
In Week 28 we will study different single column ties to understand the differences.
Somerville Bowline
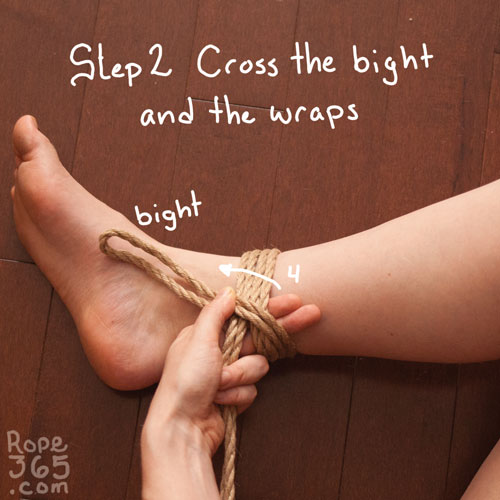
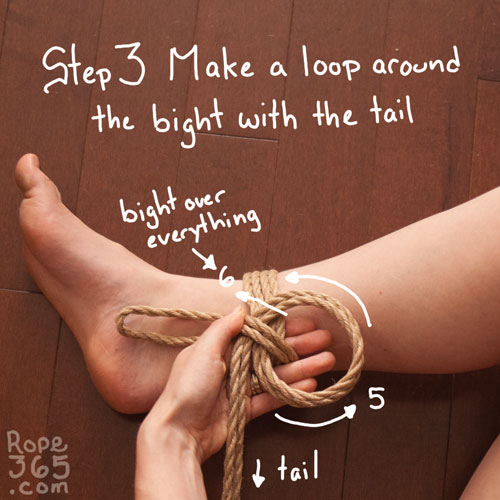
The Somerville bowline is a very stable knot that will work with any types of rope. It can be tied using only the bight, which allows for speed as we don’t need to pull the whole rope through. It also leaves the bight accessible, making it possible to untie from the starting point without untying the rest, which is great in case of emergency. You can easily decide to use more or less wraps to distribute the pressure on the body.
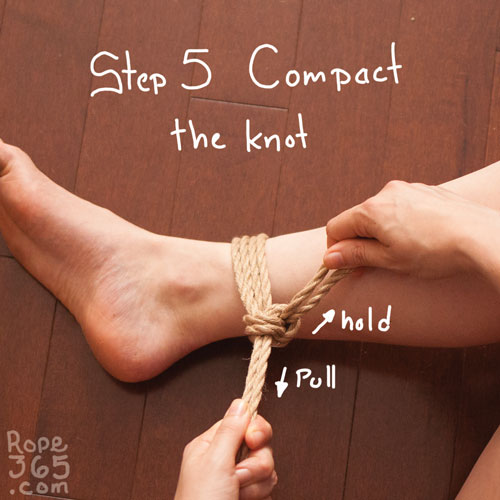
The biggest con of this knot is that it is a bit more difficult to learn, take your time to visualize the different steps and you will master it in no time. If you are struggling, don’t hesitate to explore other topics and come back to it when you feel ready. Another downside is that with a lot of pressure, the knot can compact and become difficult to untie, especially when the tail is under tension. In case of emergency, you can always use your safety cutting device if you are having difficulty untying the knot.
If you wish to make it more secure, pull the tail through the bight and it will make the knot fully locked. It is nice to have the option to keep it open to be untied from both ends or make it inescapable.

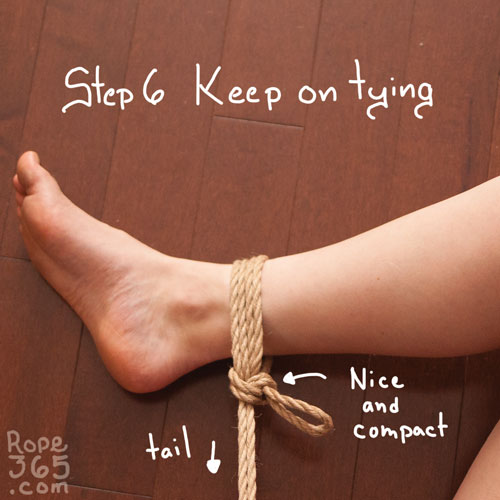
Video Tutorial
Activate subtitles or transcript to view instructions. Please like and subscribe to support the channel. Also available on Vimeo thanks to our patrons on Patreon.
Practice Time!
Repetition is the key to imprinting a tie in your muscle memory. Try it many times and change things up to keep it interesting.
Self-evaluation checklist:
- All ropes in the wrap are of equal tension and lay flat on the body.
- Two fingers gap inside the cuff, not too tight, not too loose.
- No unnecessary twists in the knot.
- The knot is compacted and tight.
- When you pull on the bight or on the tail, the structure stays intact.
Exploration ideas:
- Tie it with your eyes closed.
- Explore with different numbers of wraps (one wrap, three wraps, many many wraps).
- Different length of bight. (how short can you make it?)
- Tie on a vertical post (gravity challenge).
- Tie it behind your back.
- Tie it with one hand.
- Tie three single column ties in unexpected places.
- Try to tie with the non-dominant hand (lefty versus righty).
- Show somebody how to tie it.
Being Tied: How Do You Like It? – sansblague
Take a moment to just feel how the rope feels without you doing anything with them. Then explore what you can do to make the ropes end up where you are most comfortable with them through small wiggles. Can you wiggle without the anchor knot disintegrating? Then take a moment where you try to liberate yourself. When being tied, you can choose different approaches to being tied depending on the situation that you are in and the dynamic you have with the person tying you. Find out what is most fun for you.
Inspirations and Resources
- Somerville Bowline by Topologist
- WykD method of tying the Somerville Bowline by WykD Dave
- Collapse Of The Somerville by WykD Dave
- Somerville bowline by WykD Dave
- The Somerville Bowline: A Shibari Tutorial by Bondage Tuition
- Somerville Bowline/Circle knot single column tie tutorial by mrluckiesrope
- Somerville Bowline/Circle knot single column tie tutorial by Jesse Flanagan
- Somerville Bowline Single Column by Arizona Shibari Studio
- Somerville Bowline How To by Lochai Stine
- Somerville Bowline Tutorial by Cannon
- Somerville Bowline by The Dutchy
- Somerville Bowline by M0co
- Single Column Tie – Somerville Bowline by Belle
- The Somerville Bowline as a Single Column Tie by Kinetik Speicher
Video References
We compiled a Youtube playlist with various videos on this topic, let us know if you find others we should add to this list. Note that video references may display risky or unstable techniques, viewer discernment is advised.
Credit: Somerville bowline by Topologist – Pictures – M/R: Ebi McKnotty P: AlexK7
First, thank you for providing such a wonderful resource with this site! I’m just beginning my rope journey and this site is amazing so far!
Step 3 confused me at first. I finally figured it out after watching https://crash-restraint.com/ties/66 , which you might want to add to the resources.
If you’re inclined to clarify Step 3, I would recommend breaking it into two steps: 3a – wrap the standing end under your finger tips, crossing over bite and 3b – placing the bite over the cross of the loop
Once I figured that out, it was all easy peasy.
Thanks for the feedback. The link to Topologist is the very first 🙂
I’ve added revising this tutorial to my to do list
Thank you! I’ve been studying rope off and on for a few years and decided to kick off the training wheels, start back at the beginning and work at mastering this art. This is an amazing resource and I look forward to a great year of rope for myself and partners.
Thank you for your message. Wishing you many great years of rope 😀
Thank you for a fantastic webside qnd learning plattform. A great supplement on my rope journey.
Greatings from Moss Norway
Thank you for your message. I’m glad it is helping your. Can’t wait to go back to Moss, it’s such a beautiful place (especially the people).
Thanks from me as well. I think i know already at least the basics, but I was always afraid of doing suspenions and stuff. So now i kick into this tutorials (also because I heard a lot of good stuff about this).
Thanks for providing this.
May your ropes always sort themself and never tangle to each other (unless you want them to ^^ )
I’m glad you are enjoying the side. Wishing you the best on your rope journey
Oh wow Ebi, your website is doing great. Second ranking on google for single column tie.
It was an honour to practice with you :).
I’m in Sweden now, best of luck to you moving forward. Oh amd thanks again for that amazing show we had with the japanese artist.
Ah thank you! I didn’t realized my google ranking improved. I’ve been wanting to set that up for a while, but apparently it’s kinda working even if I haven’t done anything.
Enjoy Sweden, so much fun rope stuff in Europe!
So excited to try out this resource and jump into some ties. I had so much fun with just this beginner knot thank you!